

Note: You can always learn more and create a different sort of "studio" and lighting scheme, but this is what I do and it seems to work pretty well most of the time.
The first thing to know is that most bulbs (the lights, not the plants) you find in the house will cause a photo to be yellow/orange which is really hard to color correct and will take forever to do so and still maintain some integrity for what the plant looked like. Flashes on cameras will sometimes cause odd lighting if you aren't diffusing the flash or bouncing it off a nearby surface. You can also use gels and filters, but that's tricky stuff. Sunlight is the best kind of light but is difficult to control and isn't always around when you need it. The only option left for indoor (or controlled) lighting is to use a natural white bulb or a color-corrected bulb which aren't all that expensive, will last a good long time, and are available at big box stores like Home Depot. Use them in bell work lights, which you probably already have if you're a gardener or a DIYer, and you're on your way to a mini photo studio.
Note: I'm glossing over a lot when it comes to photography and light, but this seems to be the most pertinent.
Next is a background. I like unfettered backgrounds because I want the focus to be on the plant. You can get really fancy with these, but me? I use a sheet of white poster board ($0.33) and a piece of electrical tape ($1/roll). Sometimes I get really fancy and use two sheets for the larger shots.
 Electrical Tape Holding Poster Board in Place inside Tripod
 Poster Board Bent to Create a Seamless Background
Then it's setting up the lights, the background, and the subject (err, plant) which doesn't take long at all, and you can tweak it as you go. Turn off the flash on the camera and start snapping away.
 Initial Lighting Setup
 Unaltered Photo from Initial Setup (too many awkward shadows)
 Second Lighting Setup
 Unaltered Photo from Second Setup (shadows that can be easily removed and a good shadow under the plant)
Finally, it's time for processing, "color correcting", editing where necessary to remove "clutter", and cropping/resizing.

"Color Corrected" Image (adjusted as closely as I can to the real thing)
 Background "Clutter" Removed (1 minute of time)
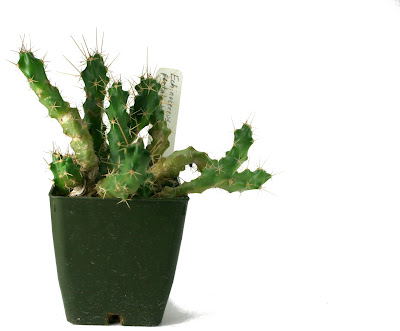
Final Version Cropped and Resized
There you have it using stuff a lot of people already have or can get inexpensively, a simple set of things to worry about and some things that aren't really necessary unless you're anal retentive like I am, and a photo that's as true to the real life thing as can be captured.
If this sort of photography doesn't appeal to you, that's fine. Just remember the part about the lighting. If you want to know more or want a more professional setup, just check on google for how to make a photo studio, how to light a photography subject, how light affects photography, etc. You'll learn a lot and very quickly too.
If this sort of photography doesn't appeal to you, that's fine. Just remember the part about the lighting. If you want to know more or want a more professional setup, just check on google for how to make a photo studio, how to light a photography subject, how light affects photography, etc. You'll learn a lot and very quickly too.
Nice, simple, inexpensive idea. I have one of those lights in my workshop - might have to invest in another couple!
ReplyDeleteOOOHH this is very helpful!! Thank you so much!
ReplyDeleteHey! Not sure if he has any relatives in Jasper proper, but he's from Chattanooga! Swafford is such a weird name to everyone in Mississippi -- I couldn't believe it when he showed me all the Swaffords in the phone book in TN!
ReplyDeleteScott went to McCallie (which is so hilariously out of character) - so I'm sure y'all know some of the same people! He's 30, a little older than you... Back in those days, he would have been hanging out with hippies most likely :)
ReplyDeleteVery helpful - thanks for the great tips.
ReplyDeletevery interesting and informative post. I have become very aware of different lighting conditions since I started blogging and photographing. Bright sunny light is best, and it doesn't seem to work so well when it's cloudy. Lots to learn - but for indoors I will definitely try out your suggestions. cheers, catmint
ReplyDelete